Upload your folder
Drop your whole project folder in and ArchviewVR reads the model, camera points and renders in your browser.
Before you start
Your folder needs three things. Subfolders are fine.
| What | File types |
|---|---|
| Model | .glb, .gltf or .obj |
| Points | .txt or .json (the points file from the exporter) |
| Renders | 2:1 JPEG or PNG 360 renders, named like their cameras |
See Organising your folder if you’re not sure what goes in.
Steps
- Start a project. On your projects page press New project, enter a Project name (and a client if you like), then press Create project.
- Drop the folder. Drag the whole folder onto Drop your project folder here. Or press Choose folder, or Choose files to pick files one by one.
- Watch it read. Under Reading your folder five steps tick off: Model, Camera points, Renders, Levels and Headings. Each render appears on the right as it’s placed.
- Look at the 3D plan. When the renders are placed, your model shows painted from your renders. Drag to spin it.
- Continue. Press Continue to check to look at anything flagged and save.
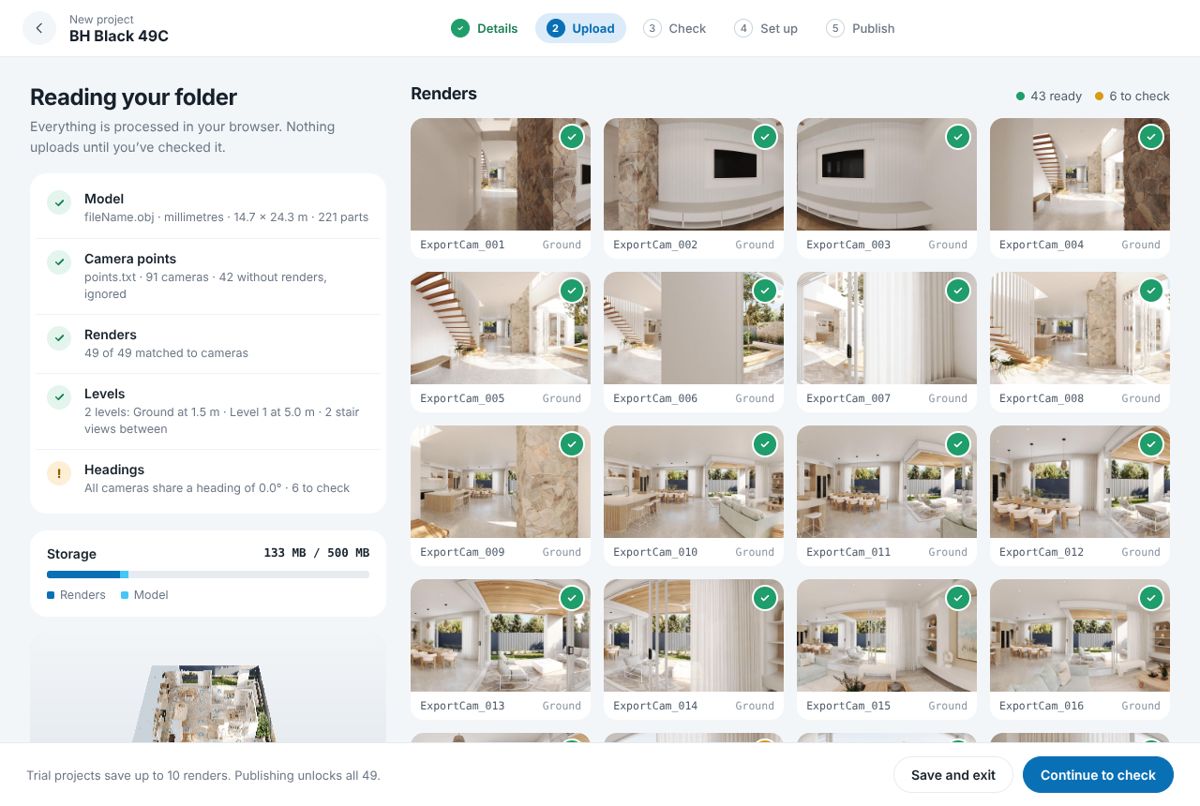
Everything is processed in your browser. Nothing uploads until you’ve checked it and pressed Accept and save on the next step.
Warning: Save and exit takes you back to the project page, but nothing is saved yet. The project page offers Continue to check while the tab stays open. If you close or reload the tab first, drop the folder again.
What the marks mean
- Tick: ready.
- !: check this one. Its heading needs a look on the check step.
- ×: not used. Usually there’s no camera with that name in the points file, or the image couldn’t be read.
Storage and trial limits
- Each project holds up to 500 MB, counting every render size and the model. The storage bar turns red if you go over. Remove some renders or make them smaller.
- A trial project saves the first 10 renders. Publishing unlocks all of them. See Trial vs published tours.
If something goes wrong
Warning: if a step shows ×, fix that item and drop the folder again. Press Start again at the bottom to get back to the drop area.
- “No model found”: add a .glb, .gltf or .obj file to the folder.
- “No points file”: add the .txt from the 3ds Max export.
- “has no camera points”: the points file is empty or in the wrong format. Each line should read name x y z. Export it again.
- “not 2:1”: some renders aren’t twice as wide as they’re tall. Re-render them as spherical 360s. See Rendering 360° with Corona.
- “with no camera”: those renders don’t match a camera name. See Camera names don’t match.
Was this helpful?